The concrete sub-floor holds many keys to a successful brick floor installation. A pre-pour meeting between the brick flooring contractor and the crew foreman of the concrete installer has proven to be a valuable way to communicate the necessary information required to create the best concrete floor surface to receive the acid brick floor.
There are several key factors in creating a concrete subfloor that will correctly drain the brick floor it supports:
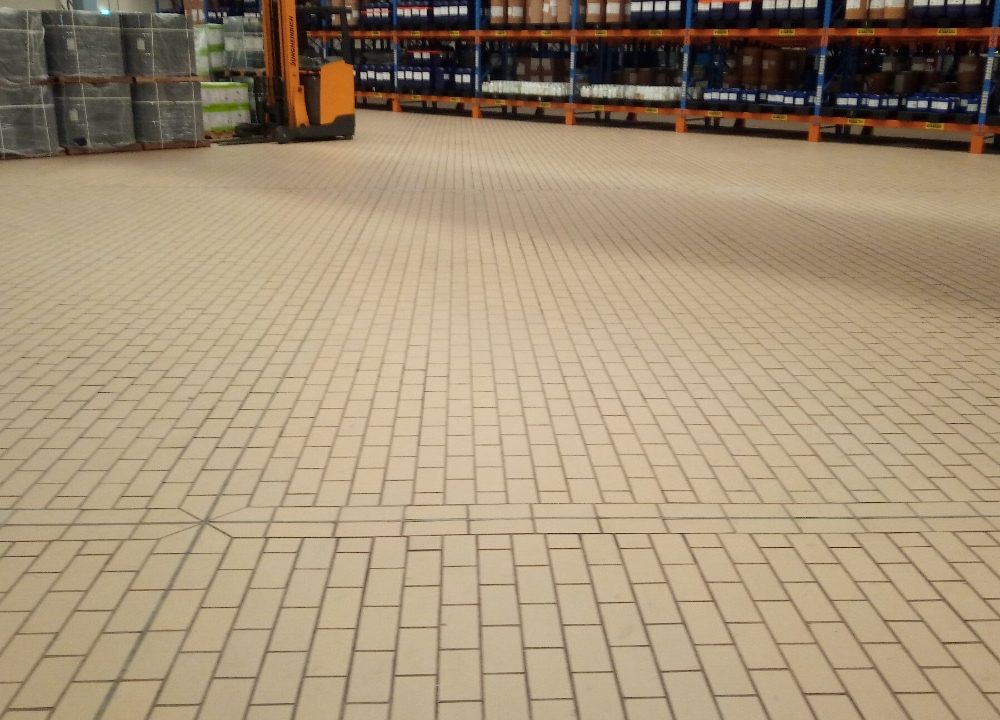
To achieve a consistent, uniform slope – perimeter screeds set level and a single, center screed that slopes to the drain. This simple system accommodates the otherwise complex requirements to establish floor slope and prevents the floor slab from “flattening out” in the corners of the drainage bay.
When designing a floor for acid brick service, it is very important to incorporate sufficient pitch for drainage into the supporting concrete sub-floor. A floor is not designed to store corrosive liquids and it needs to drain completely. Since acid brick floors are installed at a constant thickness, and cannot be “built up” to provide pitch for drainage, the necessary slope must be built into the supporting layer.
An existing floor area with incorrect or insufficient pitch for drainage can be modified to receive an acid brick floor. This will usually involve pouring a thin concrete slab, overlaid on the existing concrete. Great care must be taken to follow sound construction practices that will allow the two separate concrete pours to function as a single unit. We do not recommend using a sand-cement topping to reslope a floor to receive acid brick, since it does not have sufficient strength to function in demanding industrial environments.
How much pitch? An industry standard recommends 1/4″ per foot, which is rarely used, since it will result in a 12″ slope in 48 feet! Generally, the more corrosive the environment, the greater requirement for pitch. We recommend a minimum of 1/8″ per foot in any area, which results in a floor that drains well, while not being too steep to move on.
Accurate construction of any supporting surface for an acid brick floor is essential for a successful installation. For this reason, it is highly advisable to have a jobsite conference between the concrete contractor’s field personnel and the acid brick installer’s representative prior to any concrete pours to assure the best possible results.
The cure of the properly finished concrete slab is another important factor that contributes to a successful floor installation.
There is a strong temptation to rush the cure of a new concrete slab to enable brick floor installation to begin sooner. The time saved by reducing the necessary cure time will directly and negatively affect the longevity of the acid brick floor. As concrete cures, it gains strength as the slab completes it’s hydration process. Excess water evaporates by migrating out of the concrete during this process. If the asphalt membrane is applied while there is still excess water present in the top surface of the concrete slab, the 350°F temperature of the liquid asphalt (at initial application) will boil this water, destroying any potential bond. In addition, all the excess water remaining in the slab has been sealed from escaping upward, which will continue to degrade the bond between the membrane and concrete.
Our recommendations for properly curing a new concrete slab are to cover the initially set concrete with polyethylene sheeting (wet cure) for 2 to 3 days to allow the concrete to achieve its desired strength. Following this initial curing period, fresh air needs to be circulated to keep humidity levels low and promote removal of excess water from the slab leaving you with a properly cured concrete floor.
There are several tests to determine if a new concrete floor is ready to receive a membrane, but the simplest is a version of the “rubber-mat test”. Several squares of 4′ x 4′ polyethylene sheeting are taped down to various locations on the new floor and left for 16 hours, ideally overnight. The next day, the areas under the squares are inspected for a darker shade than the surrounding areas or condensation on the underside of the sheets. The presence of either indicates that the slab is still too damp to receive the membrane system. Our experience has shown that most new concrete, cured using the above recommendations, will cure in 10 to 14 days, much less than the safest recommendation of a full 28-day cure.
If the standard cure time is unavailable, options such as specially-designed concrete mixes and polymer concrete subfloors can be used. The installer and material manufacturer should be consulted for proper recommendations. Usually, cure times can be reduced to days instead of weeks, if the additional cost is less important than the time gained.

A proper finish of the concrete subfloor is essential to a successful installation. The ideal concrete finish will be smooth and true to plane, while providing an adequate surface profile to bond the asphalt primer and membrane.
We recommend that the concrete be poured and struck to grade with the help of accurately-set screeds, and finished by a careful one-pass float. All float marks or ridges should then be flattened with a “once-over” steel trowel finish.
The goal is to provide an accurately sloped surface with a minimum of finishing. Over-finished, excessively smooth concrete will not provide a good bond for the membrane, and excess finishing can weaken the top layer of the finished slab.
Do not use air-entraining agents in the concrete mix and do not use any film-forming curing membranes. Lubricants or release agents must not be used on forms, tools, or equipment. All these products will affect the bond or cure of the acid brick flooring system.
Good housekeeping and regular washdowns, coupled with a regular program of visual inspection of ALL brick lined surfaces, can prevent a small maintenance issue from developing into a major floor system failure.
We suggest a scheduled washdown of all floors weekly, followed by a thorough visual inspection for expansion joint integrity and general floor condition. If corrosive liquids penetrate the membrane of an acid brick floor, the floor will appear to swell or bulge in the area of penetration, an indication that acid solutions are dissolving the underlying concrete. Whitish corrosion products may also be seen in the area of attack. These conditions require immediate corrective action to prevent the damage from spreading.
The 4 main concerns regarding operations on acid brick floors are:
1. Cleaning / sanitizing chemical compatibility with the brick flooring system.
The primary chemicals that will erode furan resin joint mortar are:
A. bleach or hypochlorite sanitizers.
B. nitric acid compounds
The primary chemicals that will erode the brick faces are:
A. fluoride containing compounds
B. strong, hot caustic solutions.
2. Thermal cycling in general or local areas.
A floor primarily operated in 40° F conditions can experience thermal shock failure from intense exposure to continuous hot process streams discharged onto the floor or hot cleanup water flooding a formerly ambient section of flooring. Extreme temperature changes on the floor surface should be accomplished gradually to the greatest degree possible.
3. Localized point overloads.
Although extremely impact resistant, acid brick floors can by damaged by local point overloads. This condition is most likely to occur at:
A. doorways.
B. high traffic areas.
C. areas under frequently maintained heavy plant equipment.
4. Expansion joint integrity.
Expansion joints are known as the “necessary evil” of acid brick flooring systems. They typically follow cold seams in the underlying concrete subfloor to compensate for expected settling or movement. Since they must be able to absorb movement, they are neither as physically strong or chemically resistant as the adjacent floor brick. Since the cold pour seams are usually on high points, they are exposed to heavy physical abuse as well. Expansion joint failure is usually followed by brick edge spalling which proceeds away from the original damage with time.
A floor is not a storage vessel, so provisions for draining the corrosives off the floor must be made. When considering any drainage method for an acid brick floor, please remember this cardinal rule of corrosion-resistant masonry construction:
The integrity of any system that relies on a membrane for primary barrier protection is weakened by any and all penetrations to the membrane. This includes (especially) terminations at floor drain hubs and against pre-cast trenches.
Usually located in the center of a square or rectangular drainage bay, a 25′ square bay with 2″ of pitch to a center drain is considered an “ideal” drainage pattern from the acid brick floor design standpoint. However, the amount of underground drainage piping required for this design is a significant drawback. Each floor drain creates an interruption in the membrane, and a potential place for corrosives to penetrate to the sub-floor.
Trenches are commonly used in battery plants to drain the wetter environments. Precast trenches are available, made out of various corrosion-resistant polymers, incorporating the necessary slope into each successive section. Some precast trench drains have contributed to floor system failure due to:
The inability to properly seal the membrane against the precast system. This type of system will require a continuous interruption of the membrane at the most extreme point of exposure to corrosives.
Improper sealing of the separate sections of precast to each other, leading to leakage of corrosives below grade. For these reasons, we do not recommend precast trench drains for use in the extremely corrosive conditions found in battery plants.
This trench design will require specific exact dimensions for the top ledge detail and requires the slope for drainage to be poured into the concrete floor. Although this system has higher initial costs and is more difficult to construct properly, it has proven itself to be the most durable way to collect corrosive drainage water.
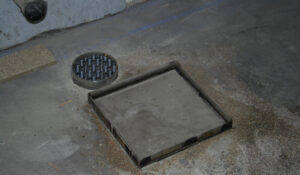
In smaller areas, it may be easiest to pitch the floor to a single collection sump and incorporate a ledge, such as illustrated above, into the perimeter edge. For either trenches or sumps, the most desirable way to remove the accumulated solution is by pumping. Incorporating a penetrating drain hub into a sump or trench will bring a risk of system failure around the penetration. If a penetrating drain is used in either case, the trench or sump should be designed to operate in a (normally) dry condition. The trench or sump should not be used for storage of corrosive solutions if there are penetrations used to drain the corrosive solutions.
